The Covid-19 pandemic has left much of the world under lockdown and quarantine. Many of our lives were disrupted when our usual living patterns of work, school and play suddenly come to find themselves shifted online. School lessons? Online. Tuition classes? Online. Hey, do you want to order some food? I guess we should also check foodpanda or GrabFood, online. Amid all these new changes, tech troubles can be immensely annoying, not to mention stressful. This is why we have come up with an easy to follow guide on how to use zoom for your online classes.
Out of the many platforms in the market you can use to stay connected with people and get work done, one of the most well-known video conferencing software used is Zoom. Zoom is free for participants and multiple people can gather to meet in real time over video conference. From features, layout of zoom, to changing your profile picture and background photos, we have got it covered.


First up, creating an account.

You can choose to sign up for free by clicking on this link and create an account using your email. Alternatively, you can sign in using Google, Facebook, or your school email. Zoom is best accessed on a laptop, phone, or tablet where you have a stable internet connection and a camera to join video calls.If you are using Windows or Mac OS, you will not be required to download any application or extension. If you are using Ipads/Iphones, any tablets or Chromebook however, you will be required to download the application from the Zoom Website, or your phone/tablet’s App Store to start using it.
Joining a meeting
To join a Zoom meeting, all you have to do is click on the invitation link sent to you. It may be in your email, calendar event, WhatsApp, or Telegram group chat. Be sure to check the source of the invitation link! You want to attend a video conference from someone you know and trust. Here is a short video on joining meetings:

If you are joining a meeting from your phone or tablet, open up the Zoom app. You can then choose to join a meeting after signing in, or join a meeting without signing in. After tapping on ‘Join’, enter your meeting ID and display name.
You are advised to use your real name, as Zoom’s waiting room function means that the meeting host can control when a participant joins their meeting. After the incidents of “Zoom bombing” in April, where strangers entering a meeting and showed obscene messages and photos to the students, MOE schools are stringent on utilising security protocols like the waiting room function and enhanced security settings.
After inputting your meeting ID and name, select if you would like to connect audio and/or video and tap “Join Meeting”. You are now in a zoom meeting!
Adjusting your settings:

In the zoom meeting, you will be able to see and hear all the participants including the host, if they have turned on their video settings and are unmuted.
Sound: To adjust your sound settings, simply tap on the Mute button at the bottom left of your screen. Muting yourself will mean that the participants will not be able to hear you. In a lecture or class context, it might be a good idea to mute your sound settings such that any background noise does not disturb the person speaking. But that depends on the preferences and rules which the meeting host wants!
To adjust any sound settings, simply tap on the ‘^’ symbol beside your mute button. From there, you will be able to adjust the microphone and speaker settings (if you have any sound issues). Be sure to test the audio before joining a meeting, so that people can immediately here you speak.Video: To adjust video settings, simply tap on the Video toggle button right next to the Mute button. To adjust how you view the screen, the top right of the screen has two buttons. The extreme top right changes your screen to a Full Screen view, and the one beside it is a button that lets you switch between Speaker View and Gallery View. Gallery View allows you to see the host and all the other participants, but Speaker View lets you focus only on the one speaking. For school lectures and class presentations, we recommend setting the view to the Speaker View.

Participating in Zoom classes
There are also some tools on Zoom that allow for your teachers to engage with you in the online class, and for you to learn effectively. These include the ‘Chat’ tool, ‘Screen Sharing’ tool, as well as the ‘Nonverbal feedback’ buttons that you can press to signal to the teacher.

- The Chat tool allows you to raise any questions you may have during class, answer questions the teacher may pose, or suggest ideas. While the response is automatically set to ‘Everyone’, you can tap on it to change to a private message to the host if necessary. In the chat room, you can discuss ideas with your peers without interrupting the auditory flow of information being presented.
- The Screen Sharing button lets you share your device screen with everyone in the class. This means that everything you can see on your own screen, others are able to view as well. To terminate the screen sharing, simply click on the red button ‘Stop Share’ at the top of the screen to stop sharing. While screen sharing, you can also click on the “Annotate” button at the top of the screen to draw diagrams or point out certain things to all other participants.
- The nonverbal feedback buttons appear at the bottom of the page when you click on the “Participants” icon in the middle of your toolbar.

The nonverbal feedback icons flash next to your name in the participants list when you click on them, and it allows you to indicate to your teacher certain things. These include:
- Raise hand
- Yes
- No
- Go slower
- Go faster
- Thumbs up
- Thumbs down
- Applause
- Mug (indicating a break)
- Clock (indicating time)
Using these signals help you to express certain things without having to unmute your microphone and speak up. The host/teacher can see when you have pressed these feedback icons and can understand your intentions better. For example, if you “raised your hand”, the teacher can stop speaking to address your query.
4. End meeting button. Once the class has ended, simply click on the bottom right end meeting button to leave the Zoom session.
If you do encounter any technical difficulties, the Zoom Help Center is only a click away.
What other video conferencing tools can I consider using?
Zoom is just one of the many video conferencing apps out there on the market. It is loved for its good video quality, free usage (with some restrictions) and ability to host meetings with large numbers of people. However, it also lacks some useful tools which other apps support. It may be opportune to ask yourself: what are some features that you would like in a video conferencing application for online learning? Making the switch might just make your life easier.
Do you want features such as an interactive whiteboard so that you can share your work with the class and get other participants to add to the presentation? What about attendance tracking features that can log your attendance immediately when you get onto the video conference? Better yet, customizable settings?
If yes, then HeyHi is just the application for you. What’s more, we offer free usage till end May 2020 as of now.

1. An interactive whiteboard with seamless screen sharing? Check.
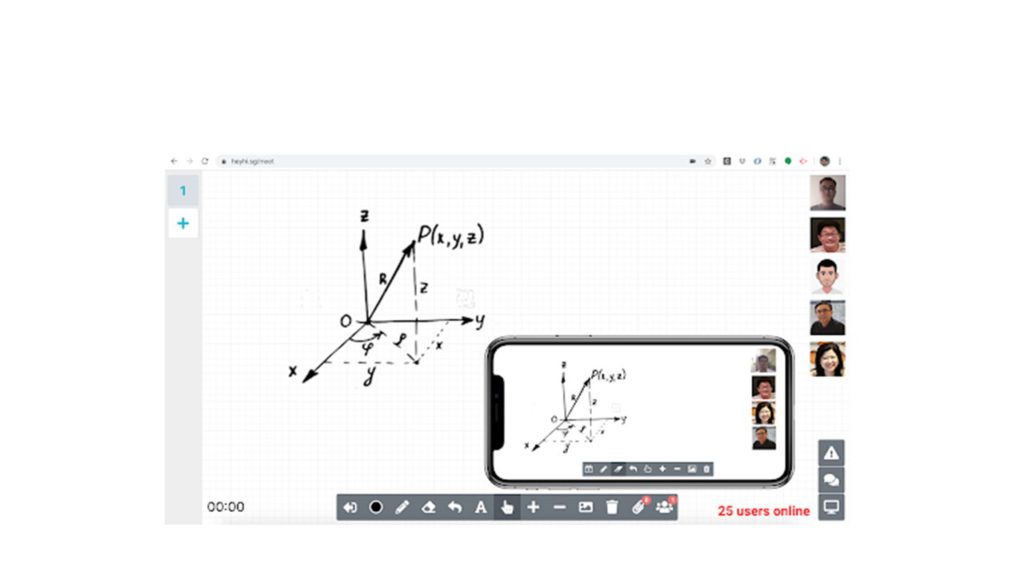
An interactive whiteboard helps your learning experience by ensuring that all participants get access to the whiteboard as well as the video call. Remember when the whiteboard used to be our main source of attention in class? Our teachers would use the board to draw diagrams and ask questions; some of us would need to answer the questions by writing on the board. Heyhi replicates that layout. The whiteboard allows you to draw freehand (if you are using a tablet), type, or even insert images and files containing your teaching material. This presents us with an intuitive shared screen where everyone is on the same page (or screen). Likewise, students are able to insert their completed assignments, answers or working, onto the shared whiteboard screen. Moreover, multiple tabs can be created on the top left corner of the screen for more working space and focused views, and screenshots can be taken so that you can easily store your notes.
On the tutor’s interface, you can also choose to lock the student’s screens such that interaction is controlled. The students would not be allowed to move the whiteboard around or interact with the screen, so that you can set up the screen to your desired projection.
2. Attendance tracking features? Check.
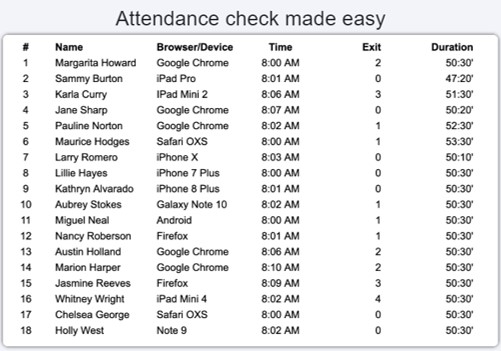
If you are conducting a big class and attendance checking takes up precious class time, fret not! Heyhi has automatic attendance checks on your students log in presence, browsers, the time they show up for online class, their exits, and the duration. This allows for easy tracking on any latecomers or students with technology issues, for you to have an easier time following up.
3. Customization for schools and enterprises?
We hear you! We just released a new meeting mode called Lecture+ this month. It is a new mode that allows for a meeting with up to 12 users (including the host).

How Lecture+ differs from the usual Classroom mode is that in this new mode, while the host tutor can see and speak directly to everyone in the meeting, the participants will not be able to see and hear other participants. Participants can still talk to the host directly and utilise the whiteboard and chat functions. But in Lecture+, the inability for participants to observe other participants contributes to reduced noise levels and distractions. The participants benefit from the focused view on the host’s presentation and the higher privacy levels. Lecture+ also allows for more users as compared to the classroom mode. This gives a huge boost to the tutors seeking to reach a more effective level of teaching using online interactive tools.
Any needs and special challenges that you face can be worked out together with us. Heyhi offers customization for schools and enterprises seeking to adapt effectively in a rapidly changing context of remote work and play. Want to transform your school/business to an adaptive learning style? We are here to help. We understand the importance of having to effectively transition from offline to online teaching and learning. You want to preserve the quality of teaching even as we are forced to transition online. This is where we, Heyhi can help.