
As educators, there are two ways that you can teach online. The first is to conduct online lessons in real-time. The second is to record a lesson and share the link with your students after. So, why would you decide to record a lesson? Perhaps, you aim to create instructional videos for students to view at their leisure and thus devote more time in class to concepts that are harder for students to grasp. Or, you could be thinking of offering a summary video for students to reference in their revision.
When recording these lessons, you may want to utilise an online whiteboard as a teaching aid. Unfortunately, some of the best online whiteboards do not include screen recording features. If so, what do you do? Do you turn away from an excellent tool that can augment the learning experience for your students?
Well, we are here to walk you through the steps to record an online whiteboard lesson:
- On a computer with Loom
- On an iPad with iOS screen record
Record online whiteboard lessons on a computer with Loom
1. Sign up for a free Loom account if you do not already have one. If you are a teacher or a student, Loom Pro is free if you sign up with your school email. To qualify for these privileges, Loom may prompt you to fill in this form.

2. Download and install the Loom desktop application. Alternatively, you may choose to install the Loom Chrome extension instead. Now, you are ready to begin recording lessons from your online whiteboard!
3. Navigate to your online whiteboard. For this demonstration, we will be using HeyHi’s online whiteboard. Since HeyHi’s online whiteboard works within Chrome, we will be using the Chrome extension. Click on the Loom icon to the right of your search bar and Loom’s interface will be superimposed over the online whiteboard.
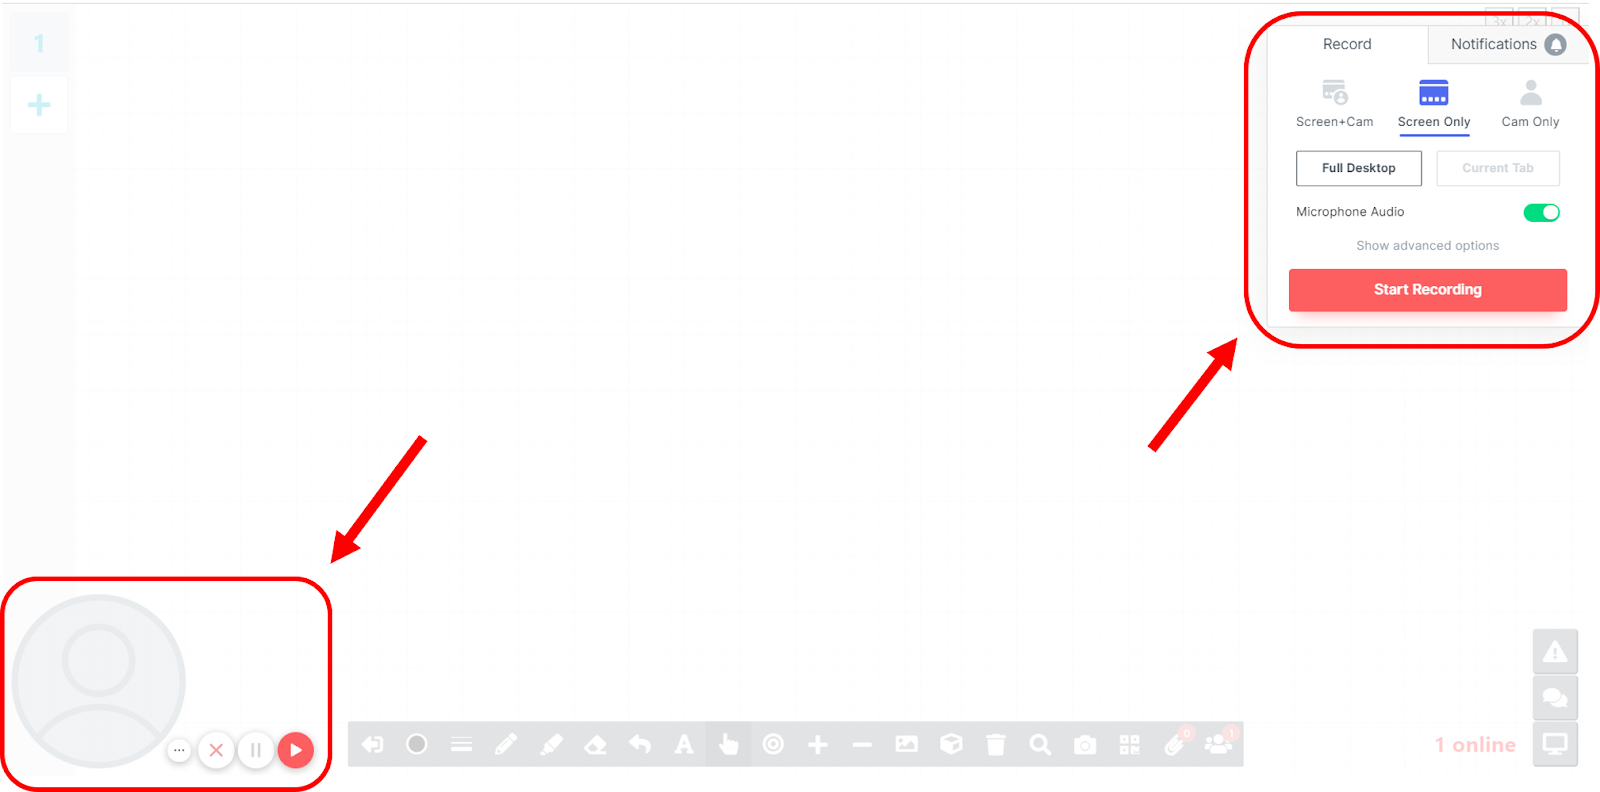
4. In the taskbar on the top right, select whether to record just the screen, the camera, or both. If you are only using HeyHi’s online whiteboard, select ‘Current Tab’ to minimise distractions from other applications on your computer. Once you are ready, click on ‘start recording.’

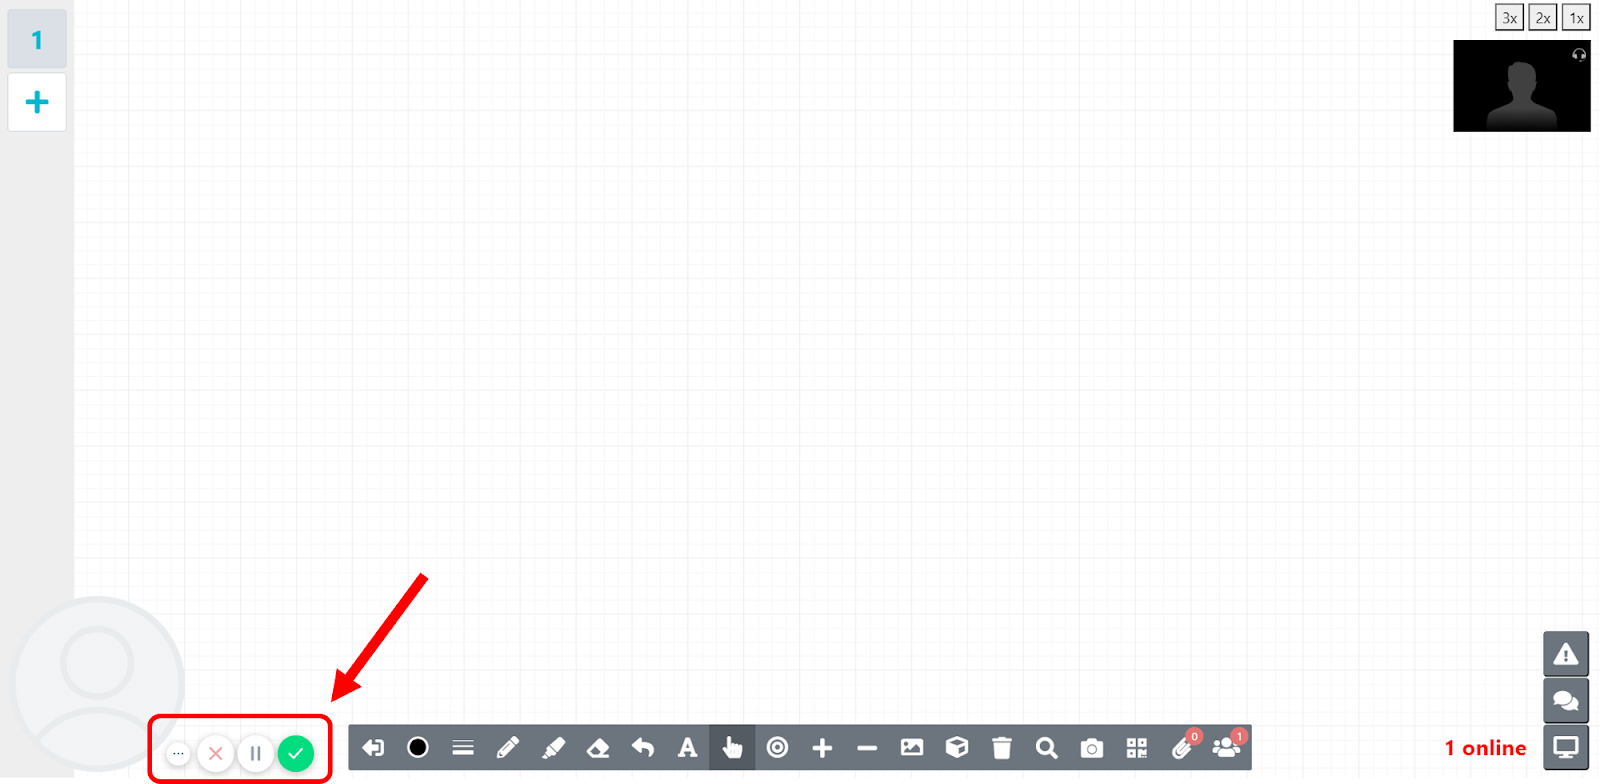
5. Select the button with the green tick on the bottom left of the screen when you are done recording your online whiteboard lesson. Tip: If you need a break to catch your breath, click on the pause button to put your recording on hold!
6. Once you have ended your recording, your video will take a moment to be generated by Loom. Once the link is ready, share your online whiteboard recording with your students! Tip: We highly encourage you to set a password for security reasons.

Record online whiteboard lessons on an iPad
Loom screen recording is available on Apple devices while an application for Android devices will be coming to the Play Store later this year (2020). If you are using an iPad and you do not wish to download anything else, we recommend that you use the screen recording function on iOS instead. We will now guide you through the steps to create an online whiteboard recording on your iPad.
1. If you have not already done so, enable screen recording on your iPad by going to your control centre in settings. Then, tap on the green ‘plus’ icon beside ‘screen recording’ to add it to your control centre.

2. Navigate to your preferred online whiteboard application. For this demonstration, we will also be using HeyHi’s online whiteboard.
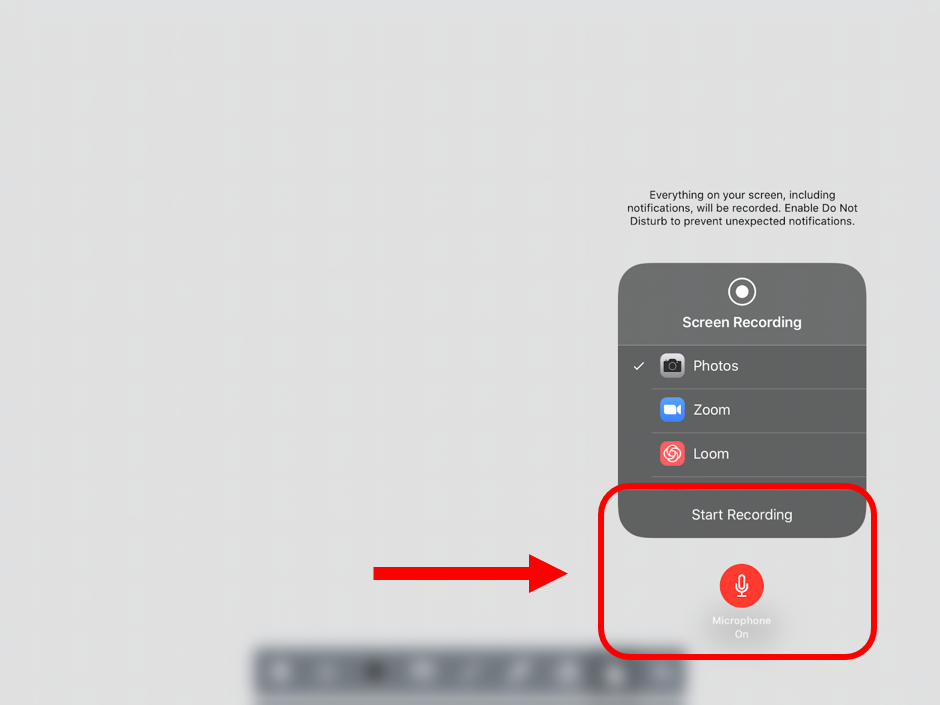
3. If you are using iOS 11 or later, you will be able to narrate and record your lesson with your built-in microphone as well. Once you have launched the online whiteboard, pull up your control centre and press deeply on the screen record icon.

4. By default, screen recording will not capture your voice. Tap on the microphone icon to enable voice recording. Whenever you are ready, tap on start recording! Tip: Record a short segment of your online lesson with narration first to check on the audio and video quality.
5. To stop recording, tap on the red record icon on the top right. Then, tap on stop recording. Your online whiteboard recording with narration will then be saved to your gallery! You may choose to edit it before you upload it to Google Drive or YouTube.

Screen recording with HeyHi’s online whiteboard
HeyHi’s online whiteboard is designed for educators to conduct online lessons with their students. Educators can opt to invite students to their online sessions, or indicate their available timings for students to reserve a tutoring or consultation slot. The online whiteboard also has video conferencing and collaborative functions to facilitate class presentations and student discussions.
HeyHi’s online whiteboard is brilliant for remote learning at any time and from anywhere. However, it may be difficult to match everyone’s schedule for group consultations and tutoring sessions. Therefore, you may choose to screen record your online lessons and share them with your students who are unable to make it for the designated time slot. In this way, your students will never have to miss out on the content covered in your virtual classroom!
Some educators such as Ms Toffy Char prefer to host online lessons from their desktop while writing with a tablet. It is also possible to record your online lesson using Loom’s Chrome extension while adopting Ms Char’s strategy for writing on HeyHi’s online whiteboard. Simply join the online whiteboard session with the access code and meeting ID to begin writing from your tablet!
Summary
This article has listed the steps for how you can easily create an online whiteboard recording for your students:
- On a computer with Loom for Chrome
- On an iPad with iOS screen record
The methods we have covered in detail do not require you to download any additional application or software. If you are using Loom’s Chrome extension to record a lesson on HeyHi’s online whiteboard, you will also not be required to navigate away from your browser.
On the iPad, the built-in screen recording function is sufficient to record your online whiteboard lesson. Since Loom Pro is free for all students and teachers, you may also want to check out Loom’s screen recording services on the iPad.
We are currently looking into a screen record feature for HeyHi’s online whiteboard. In the meantime, we hope that this tutorial has answered some of your queries on how to record lessons with an online whiteboard.
If you are interested in HeyHi’s interactive online whiteboard for your pre-recorded lessons, you may request a demo or experience the user-interface for yourself!